A king size tshirt quilt for Chris

Posted on 1 Comment

I’m still working my way though final posts about quilts I’ve made over the past couple years. This quilt I finished last year. It is still talked about!

Chris Lema contacted me about my t-shirt quilts and asked a hard question. He only had 14 shirts. Could he get a king size? The shirts were XL to XXL and all from the same WordPress hosting company.

Could I even get a king size quilt top from only 14 shirts? I did some quick calculations, gulped, and said “Sure!”

IMG_2470

Such a tiny box on arrival, compared to some.

This would be one of the first t-shirt quilts where I used some of the plain leftover pieces from the backs and sides and sleeves to help make up the fabric needed to bring the quilt up to size. Since I made this quilt, I’ve done this on almost every one.

As I went through the shirts, I made sure to cut the largest pieces possible from each one – including blank blocks. There were not a whole lot of scraps left.

Then it came time to arrange the blocks like a puzzle for the final layout. In quilting, we are often told for blocks you don’t like or ones you wish to de-emphasize, put them around the edges.  In this case, I clustered the printed shirts in the middle for best display and made sure the blank blocks were along the edges. The plan was to treat the blank blocks as a single area of negative space and fill it with the same quilting.

IMG_2595

Once I had that sorted, in my head and on the floor,  I checked in with Chris about design options. He said the scariest thing I think I might have ever heard.

“Do what you like, I trust you.”

Big gulp. o.O For anyone who has clients of any kind, this can be simultaneously the best and worst thing ever. Yay! We get full control and free reign!  And then… what if they don’t like it? What if this is not what they imagined?

After I talked myself down off the ledge, I realized he would not have entrusted me to make him a quilt if he didn’t 100% love my work. So with that in mind, I strove to make it as excellent as I knew how. Knowing Chris though my regular day job, he strives for excellence in all things and has high standards. Not 100% perfection, but excellence.

IMG_2592

With that in mind, as I worked on the quilt top I thought about the quilt back. The shirt were all from WPEngine, which has a distinctive blue as their main branding color. The first problem was the printing process on the shirts were all different so the blues are all slightly different.  Then I had an idea – I would get the official color right from their website!

Sometimes being a computer nerd is pretty handy.

Then I used a site to convert hex color codes to the matching fabric from various brands. Voila!  I ordered ten yards of Kona cotton in Breakers, because it is indeed the best out there. (sorry, could not find the site again 🙁  )

IMG_2613

When the top was all sewn together, I had to move furniture to lay it out.

IMG_2588

And the basting went on forEVER! This was only the second King size quilt I had made.


IMG_2621

Finally, we get to the fun part – the quilting! Again, for each shirt I picked a design to complement the shirt itself. This often requires more thinking and staring than actual quilt time.

IMG_2760

IMG_2761

Sometimes if I get stuck, I’ll do graffiti quilting – little bit of everything in there.

IMG_2785

I did choose to use matching blue thread for the quilting, so it would match the back but highlight the stitching on the front. All the shirts were black, grey or white. The blue was a unifier.

IMG_2808

When I got to the larger blocks, all I did was draw with chalk the spine of the feathers so they swooped and swirled around the outside of the quilt, framing the inner blocks. The bumpy bits are all freehand.

IMG_2809

Near the middle top, I had a spot that dipped down a bit, so I filled it with this medallion. Fun fact: to place this section in my machine for stitching, I had to quilt it upside down and sideways.

IMG_2815

Here’s another feather swooping around the corner.

IMG_2822

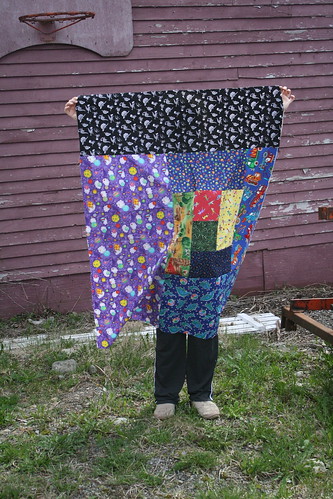
The back view really highlights all the various stitching.

IMG_2834

In the end, I had maybe barely half a yard of blue fabric left, half a spool out of four spools of thread, and the box of pins were all the ones used for basting.

I used the same fabric for binding the quilt edges, as a nice frame. I even added a sleeve at the top so they had the option to hang  the quilt on a rod if they chose to display it.

On a sunny day, right after washing and drying and careful inspection for any hanging threads or missed spots, I hung it on my clothesline for some final shots to send to Chris before mailing.

IMG_7268

IMG_7271

IMG_7273

So big!

IMG_7275

Chris LOVES his quilt so much! I still see it mentioned on twitter, so I figured I’d finally do the long awaited write up.

As my own worst critic, I’m still pretty happy with how this quilt turned out.

Time spent:
– box arrived in February
– fabric ordered in February
– cut & pieced in March
– quilted in April / May over weekends. I did not count all the hours but there was a good 16 hrs of just quilting.
– shipped and received in mid to late May
– smiles: forever

How to make a Minion quilt

Posted on Leave a comment

When I first saw the Minions fabric at Fat Quarter Shop, I told my husband, “OMG, they have Minion fabric,” and he said, “Buy it and make a quilt for Kim.”

So if the husband says buy fabric… well. Kim is an awesome lady we both work with. Some days I think she holds the place together. And she really really likes Minions.

This was a fast quilt for me, since I’m posting about the finish already. I ordered the fabric on July 4th.

If you want to make your own, you will need:
Minions Fat Quarter bundle + two panels included in the bundle (oops, out of stock. 13 prints plus two bundles)
Yellow Brick Road pattern
5 yards backing fabric
1/2 yard binding
batting

I followed the Yellow Brick Road pattern for the twin size right up to the laying out of the blocks. The twin size gives you 40 blocks from 12 fat quarters, but to go around the panel properly, you need 44.Since there are 13 FQs in the bundle, I set one aside to use as the corner blocks. I could just manage four 9.5″ blocks from the extra fat quarter. With the addition of the panel in the middle, it finishes at lap size. I left off the borders in the pattern.

IMG_3307

I did a preliminary layout here. There are two rows of seven blocks above and below the panel, and two columns of four blocks on either side. I did an initial trim of the panel to fit.

IMG_3341

Here’s the final piecing of the top, after some rearranging. I pieced the columns to either side of the panel first, then added the top and bottom rows.

IMG_3430

And then I quilted the heck out of it! For the panel in the middle, I went around each Minion and highlighted details. I used a pale yellow poly thread, top and bobbin.

IMG_3431

I decided that otherwise, I’d use an all over stipple, right into the background panel.

For the backing, I used the second panel with 5 yards of a yellow solid, and slightly offset the panel from the middle.

IMG_3426

You can see some of the quilting of the Minions on the front on the back and how they overlap the panel there. The quilting and binding were done over two days, my Friday and Saturday off work. I might have started Thursday evening, I can’t remember. I got out of the habit of writing it down and will have to do this for my other projects.

IMG_3427

(Kim is one in a Minion, for sure.)

For binding, I like to frame my quilts, so I picked a navy that was present in some of the prints. It was a less harsh than black.

IMG_3429

And then I stared at it and smiled. And took it to TWO quilt guild meetings where everyone OOOHED and AAAHHED and “where DID you find that fabric??”

IMG_3428

Then I wrote a nice note from the both of us, mailed it off and waited.

I think she liked it, because she cried. 🙂  I loved making this quilt, even though it killed me not to post progress shots. Kim does a lot, and it’s hard to look at this quit and NOT be happy, so I’m sure it will brighten her day every time she looks at it.

I think this was one of the faster finished this year, since from ordering the fabric to receiving the finish was three months.

Fast Forward with kids and puppies

Posted on Leave a comment

I started this quilt a couple-few years ago, never posted progress shots, barely mentioned it in a to finish list, then eventually quilted it, Instagrammed some shots and never blogged it.

WHEW.

So.

Here’s my official record.

With the Fast Forward pattern from Julie Herman picked up at my local quilt shop, I paired it with a really cute jelly roll whose line I can’t remember. Also purchased at my local shop. Back in 2013.

IMG_0403

I paired it with a brown solid, since I liked the dark effect on the pattern cover. I also had lots of brown to use.

IMG_0413

For the back, I picked out a matching light blue, just to break up the brown.

IMG_1898

Eventually I stared at it long enough to figure out how I wanted to quilt it. (that was last summer)

IMG_1895

I used a dot to dot sort of technique, with radiating lines. I did mark main lines to the middle of the strips. In the print parts, I did a FMQ loop de loop.

IMG_1896

Then I put it in my Etsy shop. It’s looking for a home.

I might make this again, but different, maybe a light background? There’s another pattern that looks similar, but the pieced prints and solids are reversed.

Blue bars minimalist quilt

Posted on 1 Comment

Ages ago, I saw a preview post for Modern Minimal: 20 Bold & Graphic Quilts and fell IN LOVE with the quilt on the cover.

Even though it was folded and you couldn’t see the entire thing, and it was a teeny picture, I was so inspired I pulled out all my yellows and quickly did my own spin on it.

When it was done, I posted on Instagram and someone offered to buy it within 20 minutes. Maybe that’s why I never posted about it here in my blog? It went fast. And that was 2 years ago.

But it was also quite popular. I had quite a number of private comments from others saying how much they liked it and how sorry there were to hear that someone else got it.

So, since the first one was so sunny and yellow, I decided to do the same in blues. This time the process went a bit slower.

Instead of improv, I had made sure I wrote down all the pieces on the yellow quilt so I could make it again. I have one notebook where I try and sketch out all my quilt ideas and notes and measurements, so at least they’re all in one place.

I pulled all the blue solids, and some other color groupings, editing until it felt right.

IMG_0532

IMG_0534


Piecing was easy and straightforward enough.


Sorry for blur!  Eventually I decided it needed to be bigger, so added a border.

Then finally, decide on backing, piece as needed. Baste.

It took a while for me to decide how to quilt it. I’d done straight line quilting on the last version of this, the yellow, and wanted something a bit “more”. But not *too* much, you know?

IMG_6629


Here I am testing designs on scraps. Initially I was going to use lofty poly batting, then while testing remembered how I don’t like working with it. I changed the batting used and was much happier.

Going around some blogs was the wavy line quilting, which looks fantastic but is just as easy as straight line. Still somewhat boring to do, but the finished texture. Oh my.

Even with needle troubles, thread issues and waning patience, it still manages to look darn good. According to the pictures, it took from March thru June to finish up, but I worked on a pile of other things too.


IMG_2946


The how to is the same as just straight line with your walking foot, except you change the machine setting to use the 3 step zig zag. That’s it. But oh how lovely it looks. I didn’t mark anything – just followed a seam line from the middle and spaced each one thereafter organically. Or, “works for me”.

This quilt is for sale to a good home, even though I haven’t managed to list it in my Etsy shop yet.

IMG_3053

Giggles quilt gone minimalist

Posted on Leave a comment

I have a whole pile of quilts I’ve started and finished since the last time I posted, plus some diversions into sewing bags. Like I keep telling others, just start writing.

I finally had a night with no plans and a need for mindless sewing. On a previous occasion, I had cut and bagged a number of planned quilts, so I grabbed the pieces for the Giggles quilt I had all ready to go.

Sometimes I look at stash fabrics I should use and patterns I wish to try and occasionally they line up magically. I had an idea in my head for this quilt to be very minimalist – mostly white and blue, with one single red arrow. I thought it would look striking.

I mostly just glance at patterns and skim directions. In this case I sewed too many diamonds one way. The illustrations made it seem like they were all sewn in one direction, but they are not. I love to batch sew, so I regrouped and set up batches, eventually lining up my rows correctly and making sure the red was going to wind up in the right place.

I didn’t stop to take pictures, I was half watching & listening to Hemlock Grove (of all things) on Netflix while I sewed and pressed, finding my happy place and just relaxing. I figure the piecing took 2 1/2 hours, including mistakes.

I taped it up in the only available place in my sewing cave and took this single shot.

modern solids giggles quilt. #gigglesquilt #quilting.

Afterwards I took a nice long hot soak in the tub. It was glorious.

Still deciding on binding – likely the blue – and the backing, which I can’t decide between the blue (because I have lots) or the white (of which I have enough for many quilts).

The quilting hasn’t yet been figured out. Lines placed 1/4″ from some seams would work but might be too sedate. I don’t quite want to do heavy custom work in each square either.

It will come to me eventually.

This quilt isn’t for anyone in particular, just an exercise in piecing and design. It will likely go up for sale.

Oversize log cabin

Posted on 4 Comments

I made this oversize single log cabin block quilt way back in May of 2012.

boy log cabin

I just pulled pieces of kid prints from my stash and went to town, building up a block until it was a decent size. I did very little cutting of fabric.

This summer, I finally got around to quilting it. I backed it in a cheery dinosaur print and did an allover stipple. It was fast. Then I bound it in this great lime green solid.

You can buy this quilt in my Etsy shop too.

Two Runners

Posted on Leave a comment

I finished two table runners this summer, as well. Both use fabrics from the same christmas line – Jingle All the Way and some Bernartex basics that co-ordinated.

Both runners were from the same pattern, Little Charmers 2. I love her patterns, I want them all.

I separated the dark greens, blues and the yellows for the starry runner. In the background I quilted spirals and in the stars I did straight line, somewhat dot to dot quilting.

For the blocks runner, I used the reds, lighter greens and beiges to build up the design. I messed up the color placement but anyone I showed it to couldn’t tell the difference. I quilted a leafy design following the blocks. Since it is both Christmassy and summery I called it Christmas in Australia.

Both of these runners are available in my Etsy shop.

The Mariner’s Compass quilt

Posted on 4 Comments

I got super inspired for this quilt basically when I saw the starry fabric. I dug out navy and yellow scraps and made some borders for the large piece of starry fabric, then used mostly yellows with a strips of blues for the back. So the front could be night and the back day. When I started this back in 2009 (!) I actually called it Night and Day.

I knew I wanted a large focal point that was quilted much like a wholecloth quilt is. I then decided it would be a mariner’s compass design. I looked up a bunch of tutorials on how to draw this mariner’s compass, including making a compass from a pencil and a piece of string. I used chalk to draw the lines on my quilt.

For the straight lines, I used a walking foot and navy thread. This also helped stabilize the quilt. To form the dark and light effect, I quilted with yellow thread on one side of each point and navy on the opposite side. The quilting technique I used is called McTavishing. Love it! I got pretty good at it by the end.

For the background of the compass in the sky, I did a regular stipple, in navy thread. I wanted the central focal point to stand out and the background to fade away.

In the narrow yellow border, I did a rope design – much like a ship would have. The wider blue border I had no ideas for so I’ve left them empty. I can always go back and fill them in. The binding is more scraps of blue and yellow.

You see, I did this quilt for two reasons: my grandfather and my granddaughter. My grandfather was a ship builder. Our home town is by the sea and the ocean is in our blood. On a clear night, I will look up to the sky and find Orion to orient myself.

My granddaughter love space. She insists I help her look up space videos on youTube and find out what the Mars Rover is doing. She talks about spaceships and maybe when she’s bigger she can go to space and visit other planets. In her lifetime this may be possible.

So – from ships on the sea to space ships in the sky, the stars will guide them home.

This quilt is just for me – not for sale, not for any reason but to pay homage to the travellers in our family and the stars in the sky.

Free Motion Floral Sampler Quilt

Posted on 3 Comments

A finish! Yay! This might be my first finished quilt of 2014, ugh.

For this quilt, I used the leftover blocks from my Summer Quilt. You can do this with any collection of 10″ squares. I had 25 blocks and some were duplicates.

This would look really awesome in solids or low volume prints or even alternate value prints.
I should just call this my @angelafmq sampler quilt ... ;) every block is a design from her first book.

Take your 25 blocks and lay them out on the floor or design wall until you get a pleasing arrangement. Sew two together for each row until you’ve sewn a whole row. Sew all the rows together.

(or grab two at random until you get most of the way through the stack and start sewing those pairs together. Make sure you leave enough single blocks behind to finish each row.)

Back view for texture. #quilt

For the backing, I had fabric that was 54″ wide and used that. Baste well with batting of your choice. Mine needed work.

For the quilting – this is the fun part.

I used my walking foot first and stitched in the ditch for each seam, leaving a nice square sewn for each block.

Scroll quilting.  I need practise there too. Hard to do in a square. :)

In each square, I quilted a different free motion design using the Bernina Stitch regulator on some and my free motion foot. I worked my way through Free-Motion Quilting with Angela Walters
and some of Leah Day’s free motion quilting designs as well. Have fun here! I used a white thread in the top and bottom on all fabrics.

For the binding, I trimmed the back so it was 2″ all around and folded it over to the front, then sewed it down. I screwed up trying to trim the corners so I won’t show that bit – just know there’s a gap. Sigh. I really need to work on mitring my binding, especially the “bringing the backing to the front” kind, which I don’t do often.

Nice and crinkly from the dryer.

This quilt I am leaving in my own stash for an example of the kind of quilting I can do. I hope eventually to maybe quilt for customers, so this should give them something to look at to pick quilting styles if wanted. At the very least, it showcases my skills now and I can compare it to another quilt a few years from now.

Colorblock quilt, all done!

Posted on 7 Comments

For finish it up Friday, I got the bonding all done on this quilt. It’s now taking a spin in the wash. I always wash and dry the baby quilts then check them over for loose threads and any place where I did a lousy job seaming.

Binding all done, time for a wash!

I’m really happy with how this one turned out. I’ve been working on piecing accuracy and undoing some bad habits I picked up over the years, like pulling the fabric taut while I sew. This causes it to ripple on the edges when relaxed.

Here’s a shot of the back, upside down.
Bach

I went and bought all new fabrics for this one, from the same line. I don’t usually do that.